

Wednesday, December 18, 2013
Old Pickle Jars into Pottery Barn Knockoffs
Monday, December 16, 2013
Wood Christmas Sled Mini Makeover

It's definitely cute, but I decided to give it a mini makeover.
Wednesday, December 11, 2013
Cabin Chronicles Part 11

Monday, December 9, 2013
Handmade French Christmas Postcard Ornaments

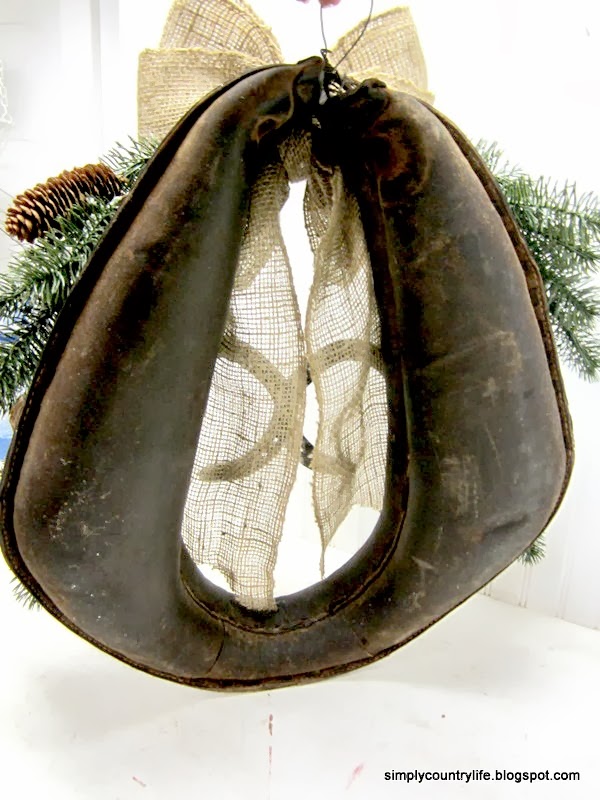
Thursday, December 5, 2013
Old Leather Horse Harness Christmas Wreath
Sunday, December 1, 2013
Burlap and a Dollar Tree Ornament

Friday, November 22, 2013
Old Tin Measuring Cups Turned Christmas Decor

Wednesday, November 20, 2013
Cabin Chronicles Part 10

(here's a pic of the completed fireplace and chinking)
Saturday, November 16, 2013
Cabin Chronicles Part 9

Friday, November 15, 2013
A Chicken Feeder and a Mason Jar

Sunday, November 10, 2013
Rustic Pine Cone and Burlap Wreath

The inspiration for this wreath came from Pinterest.
Tuesday, November 5, 2013
Quick and Easy Simple Pumpkin Wreath

Friday, November 1, 2013
Handmade Holiday Ticking Pillow Covers with Vintage Images

Saturday, October 26, 2013
Bottle Brush Trees and Old Wooden Spools

I had a few ideas of what I thought I would use the spools for.
My first thought was to use them as hooks on a coat/hat rack, but then the cooler weather changed my direction.
I decided to jump ahead a little to CHRISTMAS!!!!
Thursday, October 24, 2013
Rustic Wood Framed Faux Winter Chalkboard
Brrr

I had been given this rustic wood frame back in the summer and have held onto it until now.
I love that it has the bark left on the outer edges.

Chalkboards are super "IN" right now and I have yet to create one, but it is on my list of projects. You know that list, the one that never seems to end.
Thursday, September 19, 2013
Upcycled Rustic Pumpkin Candle Holder


I kept a pair to use in our cabin and the other pair went into my Etsy shop.
You'll probably never look at chair feet the same now.
'til next time,

Linking to:
Craftberrybush, Farmhouseporch, The Pin Junkie, 52mantels, A Night Owl Blog, Shabbynest, Tatertots and Jello, Six Sisters Stuff, Funky Junk Interiors, Its Overflowing, Uncommon Designs, Home Stories AtoZ, Cherished Bliss, Crafts a la mode, A Peek into my Paradise, A Stroll Thru Life,
Knick of Time Interiors, Love Grows Wild, Your Home Based Mom, The Hankful House,
The Shabby Creek Cottage, Cozy Little House, My Repurposed Life, The Best of DIYKnick of Time Interiors, Love Grows Wild, Your Home Based Mom, The Hankful House,
Friday, September 13, 2013
Rustic Burlap and White Pumpkin Fall Wreath
Oh how I love fall. The scents, the cooler temps, the colors, the coziness of it all.
I wasn't going to start decorating for Fall until the first weekend in October, but with the temps dropping a little and all of the wonderful inspiration around, I just couldn't help myself. I had to make something for Fall. I dug around in my craft stash and found a few things that got me started on this wreath.

This is an image I pinned last year and it is also where I drew my inspiration from for this wreath.

I love the neutral, rusticness of it. (is that a word?)
In my craft stash I found everything I needed to make this wreath. I had 6 faux orange pumpkins, scrap burlap, twine, stencils, paint and a grapevine wreath.
First, the orange pumpkins were getting a creamy white makeover to start this project.

I removed the brown stems from the pumpkins so that they wouldn't get painted white. I put them back in after the pumpkins were dry. I stuck the pumpkin floral pick stems in styrofoam so that I could spray them from all angles. This took a couple of coats of paint. In between these coats I started making the GIVE burlap pennant banner.


I cut a length of twine and also cut four 2" wide by 2 1/2" long triangles out of a manilla file folder to use for the letter pennants. I cut squares of burlap large enough to fold over the twine and cover both sides of the manilla triangles. With spray adhesive glue I attached the burlap to the triangle and them trimmed around it. I did this for each of the four letters.
Once the pennant banner was ready and the pumpkins were dry, I painted the letters on using stick on reusable stencils and black acrylic paint.


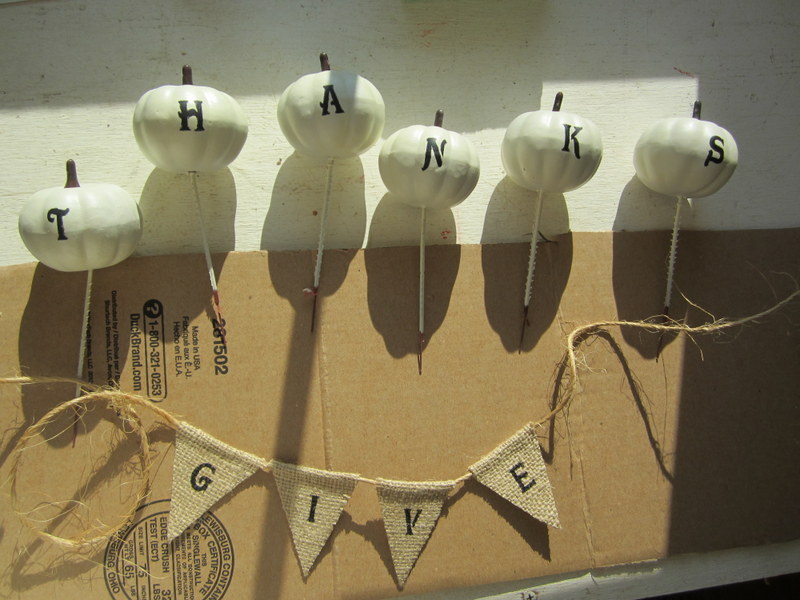
Notice the brown pumpkin stems are back on the pumpkins now :)
I was stumped at this point because the grapevine wreath I had wasn't large enough to accomodate all of my pumpkins without making the word THANKS look funny.
Then I remembered a different grapevine wreath, kindof a basket type, that I had picked up at a yard sale for a buck earlier this summer. It was larger and because it had an open basket type bottom, it worked great!
I tied the twine ends from the pennant around the top part of the wreath and started arranging the pumpkins on the bottom part. I used the stems to weave through the grapevine to hold them in place. The wreath looked a little bare at this point, so I added fall leaves and didn't like them and started looking for something else. That's when I found some preserved green moss. I placed it around the pumpkins and I think it was the finishing touch that the wreath needed. It kept it neutral, but added a little pop.


I'm thinking I'm liking the white pumpkins this year.
What about you, do you prefer orange or white?
Happy Fall decorating.
'til next time,
Adina
Linking to:
Vintage Inspiration Party
The Pin Junkie
Craftberrybush
Farmhouseporch
A Night Owl Blog
Shabbynest
Tatertots and Jello
Six Sisters Stuff
Funky Junk Interiors
Its Overflowing
Uncommon Designs
Home Stories AtoZ
Cherished Bliss
Your Homebased Mom
Flamingo Toes
Linking to:
Vintage Inspiration Party
The Pin Junkie
Craftberrybush
Farmhouseporch
A Night Owl Blog
Shabbynest
Tatertots and Jello
Six Sisters Stuff
Funky Junk Interiors
Its Overflowing
Uncommon Designs
Home Stories AtoZ
Cherished Bliss
Your Homebased Mom
Flamingo Toes


Thursday, September 12, 2013
Cabin Chronicles Part 8
Moving right along and moving to the upstairs.

How do you like our handmade, makeshift ladder staircase?
We decided to create our own wood floor from 2x4 boards. This saved a lot of cash. Buying 2" thick wood flooring was pricey. The floor had to be 2" thick upstairs to meet building codes because there is not a subfloor up there. Normally, when you have a subfloor already down you can use 1" flooring.
So, how did we turn regular old 2x4 lumber into flooring?

Then we would turn the board on it's small edge and push it against the guide again and run it along the blade. This created a 1" square cut out of the corner of the 2x4. The red arrow points to a corner that is finished.
We made these cuts on two opposite corners of each board. This created a "lip" so that we could overlap the 2x4s when we nailed them down as flooring.

Hopefully, you can kindof see what I'm trying to explain.
Here's a diagram, just pretend the black areas are the ends of two boards.

Each board can slide together and create a floor without gaps.
Boy did this take FOREVER and it wasn't without tears. The table saw totally freaked me out because the blade is exposed and I was certain we would not get through this project without losing an appendige. The boards were 12 feet long and it took patience to guide each board over the blade the whole length. Each board had to be cut four times. I just knew something besides the board was going to get cut, but it didn't. Whew.
But wait, it wasn't all smooth sailing. Once we were nearing the end of our HUGE pile of boards and all of them where cut so nicely and ready to be nailed down, we realized they didn't fit together very nicely after all. At some point the guide that was set at 1" had moved to less than 1". The cuts we had made were not going to be deep enough to overlap the edges of the 2x4s.
It was late and we had been at this all evening. I was tired and in tears at this point. I really wanted to get up the next day and nail the boards down and be done with the upstairs floor, but that wasn't going to happen. We had to recut at least half of the boards before we could proceed to the nailing part.

There's my husband, looking in digust at the boards. That pile was only a small amount of the 1000s 100s we had cut. I'm plopped on the sawdust covered floor crying in the corner.
What else do you do at 1am but go to bed. We got up Saturday morning ready to tackle this again and recut the boards. By lunchtime we were ready to start carrying boards upstairs and nailing them into place. This part went pretty quickly. He was upstairs nailing and calling down the measurement for the length of the next board so that I could cut it and hand it up to him. We staggered the lengths so that the seams between the ends of the boards weren't all in the same place, creating a funny looking line across the floor.

Again, this part went quickly. It was only mid afternoon and we were done. I think a shower followed by a nap was the next thing on my todo list that day.
The floor turned out great and it created a cool looking ceiling in the downstairs area too.

These pics are a little farther along in the construction, but they give you a better idea of what the floor looks like. (covered in sawdust)


You'll have to check back later to see what the ceiling downstairs looks like. I'll show you that when we get closer to the end of the construction.
If you'd like to see the pile of logs we started with,
you can follow along the whole construction process here.
'til next time,
Adina
Tuesday, September 3, 2013
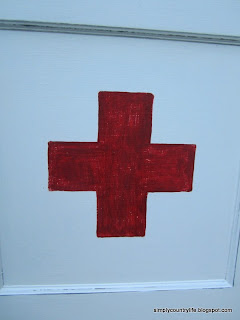
An Old Handmade Medicine Cabinet Gets a Little First Aid
It was speaking to me. I loved it. I loved the fact that it was handmade. I loved the fact that even though it had a couple of coats of paint, the inside was left natural. I loved the fact that it had history.
This old medicine cabinet was a barn find during a recent trip to Pennsylvania. I'm not even sure the owners knew they still had it. When I pulled it out from under a table and asked them how much they were asking for the piece they looked very confused. Maybe they were just wonderring why I wanted it. It was $1. SCORE!!!! Here it is, in all it's painted up dirty glory.


This old medicine cabinet was a barn find during a recent trip to Pennsylvania. I'm not even sure the owners knew they still had it. When I pulled it out from under a table and asked them how much they were asking for the piece they looked very confused. Maybe they were just wonderring why I wanted it. It was $1. SCORE!!!! Here it is, in all it's painted up dirty glory.

The first layer of paint was turquoise and then a second layer of a pinkish peach paint covered that and then add some dirt and spider webs.

Check out the inside. Never painted! The back is made from old tongue and groove beadboard.

My husband was with me when I spotted this and I think even he wasn't sure what I would do with it, but I had a plan.
First things first, the cabinet received a good scrubbing. Then I proceeded to remove the old hinges.

Unfortunately, they had a couple layers of paint on them also and were a bit of a challenge to remove. Eventually I was able to get them off. Then I soaked them in paint remover. I wanted to reuse them and was hoping they would have an aged look after the paint was gone.
With the hinges removed, I was able to separate the door and the main part of the cabinet. The next step was to give both pieces a good sanding, then I could proceed with my vision.
I painted the edges of both pieces black.

I did this in hopes that when I painted the entire piece white and distressed it, the black edges would show. It kindof worked.

It took three coats of white paint to get good, even coverage everywhere. Once both pieces were painted and lightly distressed I designed a first aid cross in the center of the door...

...and painted it red.

This took about four coats of red paint to get a solid colored cross. I distressed the cross a little too.

Now, onto the main part of the cabinet. First, I cleaned it again and then gave it a coat of danish oil to help protect the natural wood.

Back to the old hinges. After removing them from the paint remover and rinsing them really well, I used a wire brush and was able to remove all of the paint from them and the screws. They looked aged and I was thrilled that I was going to be able to use the original hinges again.

I screwed the new, old hinges to the cabinet and the door. Once it was put back together I sealed the outside of the cabinet with a protective clear matte sealer.
Here it is, after a little "first aid" :)


I'm more in love now. My husband was even a little impressed with the transformation. If only I could show the original owners in Pennsylvania. I think they'd be pleased that their cabinet has found a new life. What do you think?
'til next time,
Adina
Linking to:
Subscribe to:
Posts (Atom)